| Using the LM-13 Frequency Meter As A VFO - Main Page | Replacing the Neon Lamps with a 0A2 Regulator Tube |
| Power Supply | Grid Blocking the Oscillator During Receive |
| 2 Transistor Buffer Amplifier and 1 to 2 Voltage Step Up Transformer Page | Schematic Diagram and Circuit Descriptions |
| How to Read a Vernier Scale | Making an Aluminum Case for the LM-13 |
| Exterior Photos | Interior Photos |
| Resources and Manuals |
Introduction:
When I obtained my LM-13 it had no case or power supply. I thought it was a
piece of scrap only usable for parts. I quickly learned that it was actually a
valuable piece of WWII history and with some tender loving care I could bring
it back to life and use it as a VFO.
I designed and built a power
supply for it and found that it worked beautifully, but the lack of a case
was a serious problem. I keep a supply of aluminum sheet in stock at all times
and decided that I would build a case out of 0.040" thick aluminum sheet.
My case is made out of two pieces of aluminum sheet, each 0.040" in thickness. This is the thickest my metal brake can handle, and is more than adequate. The case is made out of two pieces, an "L" shaped piece that constitutes the bottom and back of the case, and a "U" shaped piece that makes up the top and sides. The "L" shaped bottom/back piece is designed to fit in between the top/side piece. Both pieces fit into the front flange and are fastened to it with 4-40 flat head screws. See the picture below.

Click for a larger image.
. An "L" shaped piece is used for the bottom and back and a
"U" shaped piece is used for the top and sides.
The "L" shaped piece fits in between the "U" shaped piece.
In this picture the LM-13 is upside down
Aluminum Sheet:
I used 6061 aluminum sheet because I had it on hand, but type 5052-H32 aluminum
sheet seems to be the least expensive, and is more than adequate for a project
such as this. There are several sources for aluminum sheet, but one of the best
and least expensive is OnLineMetals.com. Below is a link to
their page on 0.04" thick 5052-H32 aluminum sheet:
0.04"
thick 5052-H32 aluminum sheet at OnLineMetals
For a project like the LM-13 you'll need a piece roughly 7" wide by
21" long and a piece roughly 7" wide x 14" long. This means a
couple of 12" x 24" pieces will do the job. A piece 12" x
36" might barely do the job, but won't give you much extra to play with,
and a 36" piece is difficult to work with, so I recommend 2 12" x
24" pieces. I strongly recommend getting an extra piece or two in case
you make a mistake and for future projects.
Don't get a larger piece like 24" x 24" unless you have a saw big
enough to cut it down, which is highly unlikely! Even though the aluminum is
cheaper when you buy a larger piece, cutting it down to size and working with
it can be very difficult!
Cutting the Aluminum:
You can use a single ended hack saw for making long cuts in the aluminum, but
it is a real chore and will leave a rough edge. A much better solution is to
use a band saw. Some of the band saws you can buy at Sears, Lowes, Harbor
Freight, etc. are very reasonably priced and can be used to cut aluminum if
they are variable speed and are fitted with a blade for non-ferrous
metal cutting. My saw is a Sears Craftsman 11" 3-wheel benchtop band
saw with a 1/3 HP variable speed motor. I have it fitted with a metal cutting
blade and it works fine in applications such as this. You can see the saw at
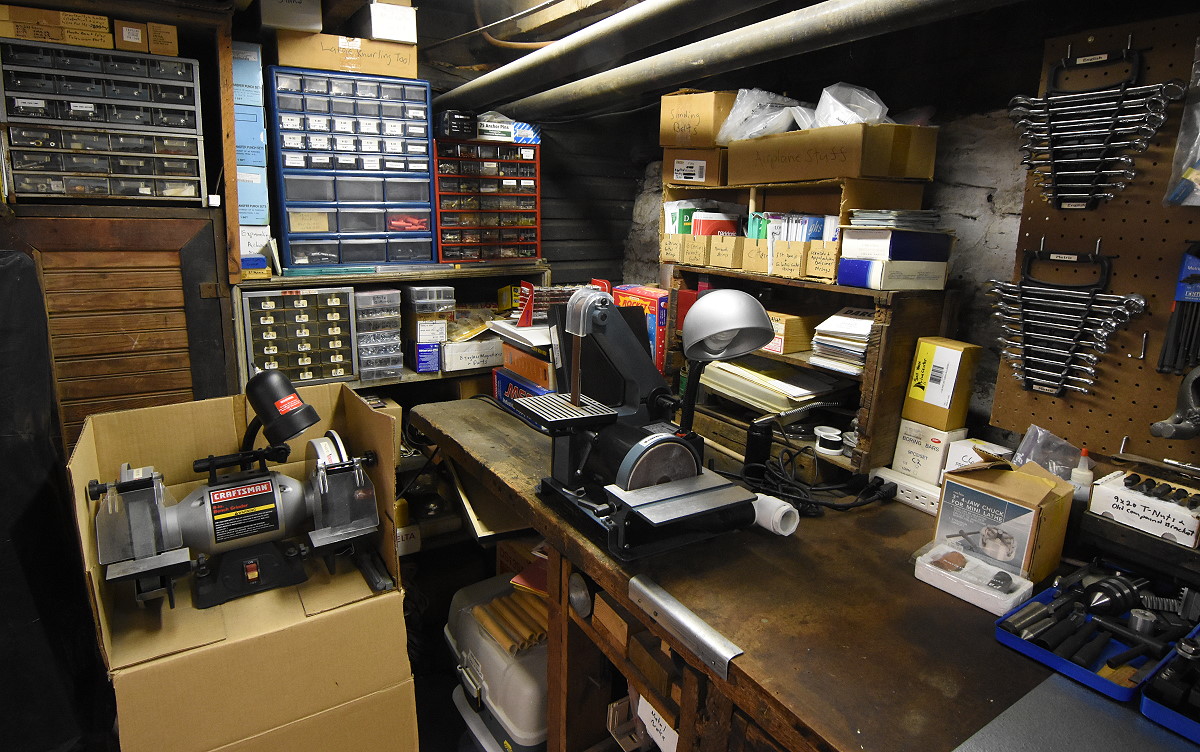
far right in the picture below:

Click for a larger image.
The band saws in AA8V's shop are at far left and far right in this photo.
The band saws in my shop can be seen at far left and far right in the photo
above. The bench top band saw at the far right is adequate for cutting aluminum
sheet if fitted with a metal cutting blade. It has a relatively small footprint
and is useful for many cutting chores. The larger saw at left can also be used
to cut aluminum sheet, but it isn't as convenient as the bench top saw and has
a much larger footprint. I use this saw primarily for cutting large steel,
brass, and aluminum stock.
Smoothing the Edges of the Aluminum
Sheet:
You can layout the aluminum sheet so that you can use a couple of the edges
that have been finished by the supplier. The edges cut by you will need to be
smoothed out for a professional job. One way to smooth the edges is to use
aluminum oxide sandpaper and a sanding block to sand them smooth. However, this
requires very precise sizing of the pieces, which is next to impossible.
A much better way is to use a power sander such as a belt or disc sander. I use
a combination belt/disc sander that has a 1" belt and a 5" disc.
These can be found reasonably priced at Sears, Home Depot, Lowes, Harbor
Freight, etc. You can see my sander at center in the picture below:
Click for a larger image.
The combination sander in AA8V's shop can be seen at center in this photo.
The sander not only makes producing smooth edges a snap, it
makes sizing the pieces much easier because you can cut the aluminum
slightly oversize and sand it down to the final dimension. Because of this,
I highly recommend that you get a sander. Mine has a 1" belt and a
5" disc. It has a small footprint and is useful for so many things I don't
know how I got along without one. The 5" disc can be used for sanding the
edges of aluminum sheet that have been cut with a hack or band saw and produces
a finish equal to or better than that from a supplier. The 1" belt is
great for sanding smaller items. 1" replacement belts and 5" discs
are readily available in a variety of grits. 150 or 180 grit is good for
smoothing the edges of sheet aluminum. My sander also hooks up to my Shop-Vac
for dust collection so the sanded off metal doesn't get all over the shop.
Bending the Aluminum:
Once the aluminum has been cut and the edges smoothed, it must be bent into the
proper shape. There are many ways to bend aluminum sheet, but the proper way is
with a device called a metal brake. These can be quite expensive, but a
company called BAC Industries makes
a couple of metal brakes that are small and affordable, of the type suited to
the hobbyist and ham radio operator. The one I use is the 18" model called
the
Mini-Bender,
as shown in the photo below:

BAC Industries 18" Mini Bender
Click Here to go to the BAC Industries Mini Bender Page
Bending the aluminum for the LM-13 is almost too big for the Mini Bender to handle, but with care and proper mounting it will do the job. The operation of the brake can be seen in the following two photos:

Click for a larger image.
Preparing to bend the bottom/back piece into an "L" shape.
The metal brake must be firmly attached to the bench. This is best done by bolting it to the bench, but it can be firmly clamped with vise grips as shown above for temporary use. The aluminum sheet must be firmly clamped under the bender brake bar with C clamps as shown. The trick is, of course, determining exactly where to bend the aluminum. Once the proper place is determined, the brake is used to bend the sheet. You will have to bend the aluminum more than 90 degrees to account for the springiness of the aluminum. The photo below shows the aluminum sheet being bent.

Click for a larger image.
Bending the bottom/back "L" piece with the metal brake.
Fitting the Top/Side Piece to the
Front Flange
Determining the proper place to bend the sheet can be difficult, and is best
done by practicing on small scrap sheets of the same material. Scribe a
sharp line exactly 2" or 3" from the edge of a small scrap sheet and
line it up in the bender with the line precisely between the bender
plates. Now clamp the brake bar on top with the edge of the brake bar
precisely on your scribe line. Now make a 90 degree bend., and remove the
scrap piece from the bender. You can now measure this piece and see how much
the bent side goes beyond your scribe mark. Knowing how much the bent side
goes beyond your scribe mark will allow you to compensate for the bending
process when sizing your aluminum.
As mentioned earlier, my case is made out of two pieces of aluminum sheet,
0.040" in thickness. This is the thickest my metal brake can handle, and
is more than adequate. The case is made out of two pieces, an "L"
shaped piece that constitutes the bottom and back, and a "U" shaped
piece that makes up the top and sides.
Fit the "U" shaped top/side piece first. This should nicely fit into the flange on the front of the LM-13 as can be seen in the photo below. You might try practicing with a full length 1" deep piece first, fitting and bending it until it nicely fits inside the front flange on the LM-13. Then use your measurements on the 1" piece to repeat the process on a full depth piece. The full depth piece must extend past the back of the LM-13 by 0.040" to accommodate the thickness of the bottom/back piece. If you make the piece a little too deep, at is easy to sand it down to the proper size with a disc/belt sander.
Click here for a larger view.
The "U" shaped top/side piece fits inside the front flange of the
LM-13 and is fastened with 4-40 screws.
In the picture below taken from the back the "U" shaped piece has
been bent and fitted to the front flange: Note that it must be deep enough to
extend 0.040" beyond the back of the LM-13 to accommodate the thickness of
the bottom/back sheet.
When the top/side piece is inserted into the front flange so that it is flush and square, you can use the holes in the front flange as guides to drill the holes for the 4-40 screws that will hold the piece in place. Drill these with a #43 (0.089") drill and then tap them with a 4-40 tap. I do not recommend using 6-32 screws. The 4-40 screws will give you the wiggle room you will need to properly fit the bottom/back piece. 6-32 screws are larger and won't give you the wiggle room you need for a good fit.
Fitting the Bottom/Back
Piece:
The bottom/back piece must be sized and bent so that is fits into the front
flange and around the bottom and back between the top/side piece. If you
have a belt/disc sander. you can make the piece slightly oversize and then sand
it down for the best fit. It should fit into the front flange and then across
the bottom and up the back precisely between the top/side sheet. Once fitted,
use the holes in the front flange as a guide to drill and tap holes for the
4-40 screws that will hold the piece to the front flange.
In the photo below, the LM-13 is upside down and the back is towards the viewer. The "U" shaped top/side piece has been fitted and secured to the front flange with 4-40 screws. The bottom/side piece has also been fitted and secured to the front flange with 4-40 screws. As you can see, the bottom/back piece fits into the front flange and then in between the top/side piece.
Click for a larger image.
Fitting the aluminum sheet to the LM-13. In this picture the LM-13 is upside
down.
Fastening the Top/Side Piece to the
Bottom/Back Piece:
Once the top/side and bottom/back pieces have been fit, they need to be
fastened to each other to complete the case. Small side bars are made of
1/4" aluminum bar stock as shown in the photo below. There are several
sources for aluminum bar stock, but one of the best and least expensive is
OnLineMetals.com. Below is a link to
their page on 1/4" square 6061 aluminum bar stock:
1/4
" Square 6061 Aluminum Bar Stock at OnLineMetals
Cut a piece about 3/4" long. Then drill it with a #43 (0.089") drill
and tap the holes with a 4-40 tap. The two holes are at right angles to each
other and exactly 3/8" apart. They should be centered in the aluminum bar.
(As you can see below I made a slight mistake on one of mine and it is a little
off center. As you will see, slight errors such as this are not a problem.) The
bars are mounted so that the edge of the bar is exactly 0.040" (the
thickness of the aluminum sheet) from the edge. The easiest way to fit them is
to mock up the case as shown in the picture above and then tape the case
together with duct tape. It can then be unscrewed from the front flange,
removed, and the bars can be fit into the edges. The holes in the bars can then
be used as a template with a sharp pencil or scribe to mark where to drill the
holes in the aluminum sheet. Since each bar might be slightly different from
the others, number each of them and note their locations and orientations on
the panels.You must be able to return each to its exact same location with
it oriented the same way as before. Otherwise things won't fit properly. This
method compensates for slight inaccuracies in making the bars and result in a
good fit, even if you make slight mistakes in drilling the bars and the panels.
Once the panels have been marked, center punch the marks and then drill the
holes for the 4-40 screws. The official size for a 4-40 body hole is a #32
(0.116") drill, but in our case this is too small. A better size to start
with for the holes is about 1/8" (0.125"). This allows for some
wiggle room in fitting the case. You may have to drill a particular hole a
little bigger if necessary to make things fit.

Click for a larger image.
The screws that hold the panels together fit into small side bars made from
1/4" square aluminum that have been drilled and tapped to take 4-40
screws.
Once the bars have been installed and the screws have been installed, the outside edges of your panels will look like the picture below. Slightly oversizing the holes in the panels allows for slight inaccuracies in making the side bars and drilling the holes and allows for a precise fit. When the cabinet is completed, these inaccuracies are hidden by the screws. Remember: the difference between the professional and the amateur isn't whether mistakes are made, but how they are allowed for and concealed..

Click for a larger image.
4-40 screws are used for fastening the top/side sheet to the bottom/back sheet.
Slightly oversizing the holes in the top/side and bottom/back panels allows for
a precise fit.
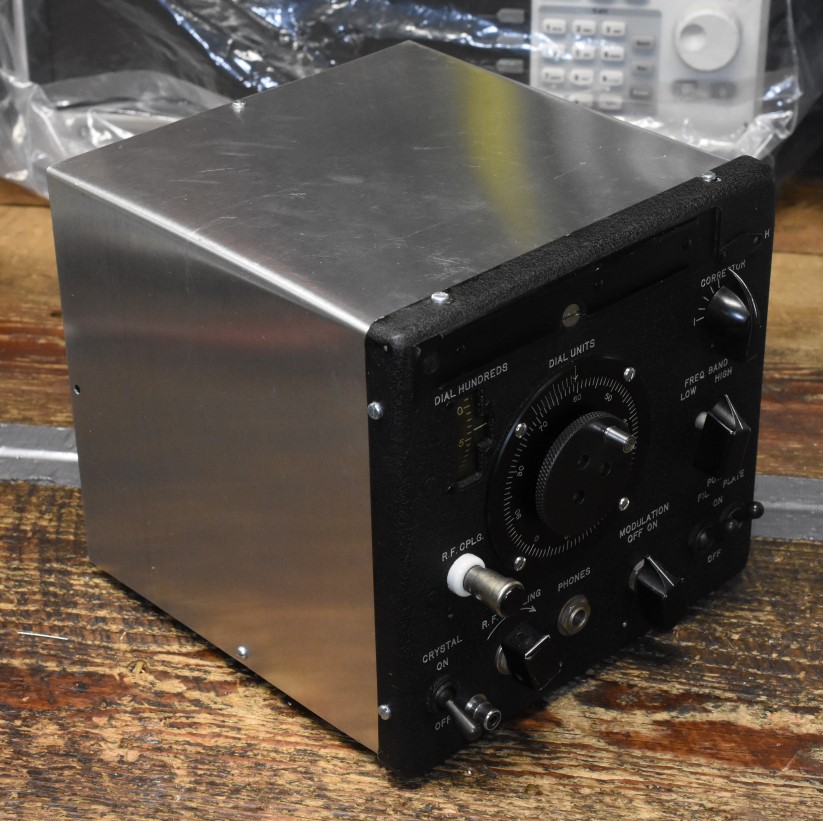
When your case is finished, it should look like the photo below: A set of rubber feet on the bottom completes the case and keeps it from scratching or slipping on the table. Once you master some of the techniques explained here, you will be able to make a case for just about anything.
Click here for a larger view.
The LM-13 in its brand new case
Making a Case Without Bending the Aluminum
For some, bending the aluminum may be undesirable. If such is the case, you can
still build a case. Simply use flat panels on all of the sides and then fasten
them together using three side bars per side. You should have a side bar in
each of the corners as well as one in the middle of each side. The result won't
be as attractive as one using bent panels, but it will certainly be functional.
Tools :
It is amazing what you can do with simple tools, but having more advanced tools
can turn a tough job into a pleasant one. Below are the tools I find very
handing for working on a project such as this one.
Power Drill or Drill Press:
A power drill or drill press is an absolute necessity. Since hand power drills
are relatively inexpensive, I recommend that you get a hand drill first. Be
sure to get one with a chuck that can handle the largest drill bit you will
encounter. This typically means a 1/2" chuck. Variable speed is a must,
especially for starting holes.
A drill press is very handy and will allow you to do a better job at drilling
holes, but for a project such as this you can probably get by without one.
Nonetheless, once you have a drill press you will wonder how you ever got along
without it. Mine is a Sears Craftsman table top model with a 1/2" chuck
that is belt driven. You simply move the belt from one pulley to another to
change to speed. It has served me well for many years.
Drill Bits:
Though bits can be purchased individually, a much better option is to buy a
set. The minimum set you will need is a 29 piece set with bits from 1/16"
to 1/2" in 1/64" increments with an indexed holder. However, a
much better choice is a 115 piece set that also includes the numbered bits
from 1 to 60 and the lettered bits from A to Z. The larger set contains the
correct drills for making holes that will be tapped and allows you to drill
holes with a larger selection of diameters. You have a much better chance of
getting just the hole size you need with the larger set. For a 115 piece set
you can pay as little as $35 to well over $100. The cheap sets won't be as
sharp and will dull easily. Remember, you get what you pay for! One option is
to buy a middle of the road set to start with and then replace the most
frequently used drills with top quality drills.
Center Punch:
This simplest way to improve the accuracy of your drilling is to use a good
center punch. After marking where the center of the hole should be, you hammer
a center punch into the mark to make a dent that will automatically center the
bit. These are inexpensive and worth their weight in gold.
Tap and Die Set:
Though you can buy taps and dies individually, it is much easier to get a set
so you have all that you need to begin with. Be sure to get one that contains
taps and dies for 4-40, 6-32, 8-32, and 10-32 screws. Like drill sets these
come in a wide range of prices. The cheap sets won't be as sharp, will dull
easily, will be brittle and are more likely to break. Remember you get what you
pay for! One option is to buy a middle of the road set to start and then
replace the most frequently used taps and dies with high quality high speed
steel (HSS) taps and dies.
Band Saw:
You can use a single ended hack saw for making long cuts in the aluminum, but
it is a real chore and will leave a rough edge. A much better solution is to
use a band saw. Some of the band saws you can buy at Sears, Lowes, Harbor
Freight, etc. are very reasonably priced and can be used to cut aluminum if
they are variable speed and are fitted with a blade for non-ferrous
metal cutting. My saw is a Sears Craftsman 11" 3-wheel benchtop band
saw with a 1/3 HP variable speed motor. I have it fitted with a metal cutting
blade and it works fine in applications such as this. I use it for so many
other things it is hard to imagine how I did without it.
Disc/Belt Sander:
A combination disc belt sander can be very handy, and small ones are available
that don't take up too much space. I use a combination belt/disc sander that
has a 1" belt and a 5" disc. These can be found reasonably priced at
Sears, Home Depot, Lowes, Harbor Freight, etc. The sander is very handy for
smoothing the edges and ends of cut aluminum sheet and bar, and can be used for
final sizing of the aluminum. Other uses are so numerous I can't even begin to
list them here.
Metal Brake:
For making quality bends in aluminum you will need a metal brake. These can be
very expensive, but as mentioned earlier a company called
BAC Industries makes a couple of
metal brakes that are small and affordable, of the type suited to the hobbyist
and ham radio operator. The one I use is the 18" model called the
Mini-Bender.
It isn't fancy, but it does the job.
"C" Clamps: and Vise Grips
You will need a couple of "C" clamps to use with the metal brake. You
will also need a couple of additional "C" clamps or vise grips if you
don't want to bolt the metal brake to the table. See the pictures under
bending the aluminum to see how these are
used.
Materials:
The materials needed for this project are readily available. You just need to
know where to go.
Aluminum Sheet
One place to get the aluminum sheet and bar is
OnLineMetals.com
Below are links to the 0.040" aluminum sheet and the 1/4" square
aluminum bar:
0.04"
thick 5052-H32 aluminum sheet at OnLineMetals
1/4
" Square 6061 Aluminum Bar Stock at OnLineMetals
Pan Head Screws
I have found slotted pan head screws to be very handy, and I like to use them
in my projects. However, finding 4-40 screws locally can sometimes be
difficult, and if you do find them locally, they can be expensive. A better way
is to buy them from an electronics supplier such as
Mouser Electronics. Mouser has always
worked well for me, they have no minimum order, and they have a $5 economy
shipping option. In quantities of 100 the 1/4" and 3/8" screws are
less than 5 cents each! I recommend that you get at least 100 of each, since
the price is much lower in quantity, and you will always be able to use them.
Below are direct links to some of the 4-40 screws available at
Mouser Electronics:
Steel
Pan Head Slotted Screw 4-40 x 1/4"
Steel
Pan Head Slotted Screw 4-40 x 3/8"
Steel
Pan Head Slotted Screw 4-40 x 1/2"
Steel
Pan Head Slotted Screw 4-40 x 5/8"
Steel
Pan Head Slotted Screw 4-40 x 3/4"
Steel
Pan Head Slotted Screw 4-40 x 1"
There are many, many other types of screws available. The above is just a list
of the ones I keep in stock in my shop. I also keep a selection of 6-32 screws
in the same lengths available in my shop for other projects.
©Copyright Statement:
All images, designs, and materials on these web pages are the property of
Gregory P. Latta and are ©2017 by Gregory P. Latta. You may use them for
personal purposes and for educational purposes, but any commercial or other use
is strictly prohibited unless written permission is obtained from the author.
Disclaimer:
Opinions expressed are those of the author or the quoted source. The author is
not an employee of or agent for any of the vendors referenced in the text and
does not sell or represent any of the products discussed. Vendors may provide
products for review purposes and may provide sponsored support through
advertising or links. No information provided herein represents professional
advice or best practices. All information is provided to help the reader gain a
better understanding of the tools and techniques described. Considerable care
has been exercised to provide accurate and timely information. However the
author cannot be responsible for information which is incorrect or out of date.
Power tools and shop practices can be dangerous if used carelessly or
improperly - always take proper safety precautions such as wearing protective
eyewear and appropriate clothing. All practices, procedures, modifications and
product recommendations described herein are to be used at the discretion and
risk of the reader.
 Back to Dr. Greg Latta's
Electrical Engineering and Amateur Radio Pages
Back to Dr. Greg Latta's
Electrical Engineering and Amateur Radio Pages
 If you have any questions or
comments, you can send E-Mail to Dr. Greg Latta at
glatta@frostburg.edu
If you have any questions or
comments, you can send E-Mail to Dr. Greg Latta at
glatta@frostburg.edu
