Writing and Essays - Rafting Manual
 Rafting Course Manual: The Rafting Manual was developed by rbk who is responsible for its contents. People are welcome to use any and all the materials. They do so with the following stipulations.
1. Users using the materials acknowledge that they are knowledgeable in swiftwater rescue and know how to use the materials contained herein. These materials are provided to assist people already knowledgable and trained in swiftwater rescue. [Yes, this is a disclaimer.]
2. The author has attempted to be accurate and has not purposely created false information. Again, users of these materials assume that they are knowledgable and can determine for themselves any errors or incorrect information. [Yes, this is a disclaimer.]

Passengers - Middle Fork of the Salmon.
Source: Author. Slide: \DSC_0063[60].jpg
3. In an effort to advance raft instruction, these materials are offered free. Anyone who uses the materials, in part or in full, may do so. The only request is to provide rbk with the appropriate acknowledgement for the materials used. In other words, acknowledge and don't plagiarize. Use, but don't abuse. Recognize the source.
[Keywords: Rafting Instruction, River Rescue]
The manual and chapter are pdf files.
Entire Rafting Manual (Version 1807)
Forward
Table of Contents
Ch.1: ACA Course Materials (see ACA webpage)
Ch.2: Equipment and Repairs
Ch.3: River Dynamics
Ch.4: Strokes and Maneuvers
Ch.5: Rafting Safety
Ch.6: Rescue Techniques
Ch.7: Trip Leadership
Ch.8: IDW-Teaching & Learning Processes
Appendix A: Examination
In addition to the manual, individual jpg files of the diagrams are available also. See the list below.

Cataraft- Middle Fork of the Salmon.
Source: Author. Slide: \DSC_0007[60].jpg
List of Available Figures
Chapter 2: Equipment and Repairs
2.1: Lehigh River Rafting
2.2: Oar Rafts on Middle Fork of Salmon
2.3: Oar Raft with Passengers
2.4: Cataraft on Middle Fork
2.5: Motorized Raft on Grand Canyon
2.6: Parts of a Raft (Side View)
2.7: Anatomy of a Raft (Top View)
2.8: Oar Lock and Mount
2.9: Anatomy of a Cam Strap
2:10: Fastening Gear with NRS Cam Straps on Grand Canyon
2.11: Coiling a Cam Strap
2.12: String of Cam Straps
2.13: Backing Off a Cam Strap
2.14: Bowline
2.15: Directional Figure-8 Follow Through
2.16: Carlisle Pump (not rbk photo)
2.17: Self-closing Valve
2.18: Life Jacket / PFD Types
2.19: Helmet (not rbk photo)
2.20: Anatomy of a Carabiner
2.21: Disconnecting Two Carabiners
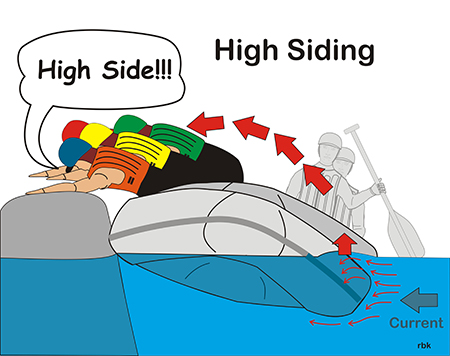
High Siding - Author.
Slide: \RS-HighSiding[144].jpg
Chapter 3: River Dynamics
[Note: These are the same diagrams from the Swiftwater Rescue Manual]
3.1: Principles of Laminar Flow
3.2: Primary Flow
3.2: Upstream and Downstream Vs
3.4: Upstream and Downstream Vs (In water view)
3.5: River Bends
3.6: Standing Waves & Riverwide Chutes
3.7: Anatomy of an Eddy
3.8: Anatomy of a Hydraulic (Hole)
3.9: Pillows
3.10: Compression Waves
3.11: Strainers
3.12: Undercut Rocks
3.13: Low Head Dams
3.14: Drowning Trap - Flood Levels
3.15: Drowning Trap - Summer Levels
3.16: Drowning Trap - Drowning Trap Levels
Chapter 4: Strokes and Maneuvers
4.1: Parts of a Paddle and Oar
4.2: The Paddle as a Lever
4.3: Blade Placement in Waves
4.4: Turning Circle
4.5: Forward Stroke (Paddle)
4.6: Reverse Stroke (Paddle)
4.7: Stroke Phases (Oar)
4.8: Forward and Reverse Stokes (Oar)
4.9: Walking the Raft (Oar)
4.10: Right Turn (Oar)
4.11: Left Turn (Oar)

Flipping a Raft - Author.
Slide: \RS-FlipRaft[144].jpg
4.12: Forward Ferry from Eddy to Eddy (Paddle)
4.13: Eddy Turn (Paddle)
4.14: Peal Out (Paddle)
4.15: Setting the Raft Around a Bend (Paddle)
4.16: Surfing
4.17: Back Ferrying from Eddy to Eddy (Oar)
4.18: Peal Out Using a Back Ferry (Oar)
4.19: Eddy Turn (Oar)
4.20: Setting the Raft Around a Bend (Oar)
Chapter 5: Raft Safety
5.1: Rescue Curve
5.2: Rescue Curve - 911 Syndrome
5.3: Narrow Temperature Range for Humans
5.4: Methods of Heat Gain/Loss
5.5: Skin Sweating (Cross Section)
5.6: Hypothermia Symptoms
5.7: H.E.L.P./Huddle
5,8: Hyperthermia Symptoms
5.9: Drysuits
5.10: Wetsuits
5.11: Paddle Jackets
5.12: Universal River Signals
5.13: Whistle
Chapter 6: Rescue Techniques
6.1: Search and Rescue Phases
6.2: Determining the Search Area and the Point Last Scene (PLS)
6.3: Anatomy of a Throw Bag
6.4: Typical Throw Bag Rope Types
6.5: Stuffing a Throw Bag
6.6: Defensive and Aggressive Swimming
6.7: Back Ferrying - Defensive Swimming
6.8: High Siding
6.9: Self-Entry
6.10: Assisted Reentry
6.11: Flipping the Raft
6.12: Solo Wading with Paddle
6.13: Simple Rope Tether
6.14: Snag Line
6.15: Unpinning a Raft
6.16: Unpinning a Raft (Line)
6.17: Pinned Raft Rescue - Upper Yough
6.18: 5:1 System
6.19: Dzialo Incident - Deerfield Site
Chapter 7: Trip Leadership
7.1: Flow Model
7.2: Adventure Experience Paradigm
7.3: Perceived and Real Risks
7.4: Roller Coaster Experience
7.5: Raft Trip from Hell (pdf)
7.6: Pre-trip Talk - Introduction
7.7: Pre-trip Talk - Experience
7.8: Pre-trip Talk - Life Jackets
7.9: Pre-trip Talk - Paddles
7:10: Pre-trip Talk - Strokes & Commands
7.11: Pre-trip Talk - Rescue/Swimming
7.12: Pre-trip Talk - To the River
7.13: Commands for the Crew (pdf)
7.14: Cheryl Taylor Fatality in the Keeney Rapids on the New River
7.15: Follow the Leader
7.16: Eddy Hopping
7.17: Leap Frogging
7.18: Throw Bag Drill
7.19: Seating Arrangements
7.20: Avoid Wedging the Feet Underneath the Thwarts
Chapter 8: IDW - Teaching and Learning Processes
8.1: Small Group Presentations
8.2: Instructor in Raft (As Crew Member)
8.3: Instructor in Raft (As Passenger)
8.4: Instructor in Adjacent Raft
8.5: Discussion Format
8.6: In-raft Discussion
8.7: Enjoyment Curve
8.8: Station Approach
8.9: Moving Station Approach